

Chia farming with a Raspberry Pi
How to set up a Chia farming rig with a raspberry Pi 4 , external drives, and a USB 3 NVMe M.2 SSD drive.

Recently I was playing around with a newish cryptocurrency called Chia. Chia's primary difference is that instead of Proof of Work, created by GPU's hashing constantly and burning through a heap of electricity, it uses Proof of Space and Proof of Time by means of storing pre-calculated hashes on unused storage, in things called Plots.
You then "Farm" the plots, which counter to regular bitcoin mining, requires very little in the way of additional computation and energy, and functions more as a lookup table to decide whether or not you can provide a needed hash to solve a puzzle for a transaction, which will score you some sweet crypto.
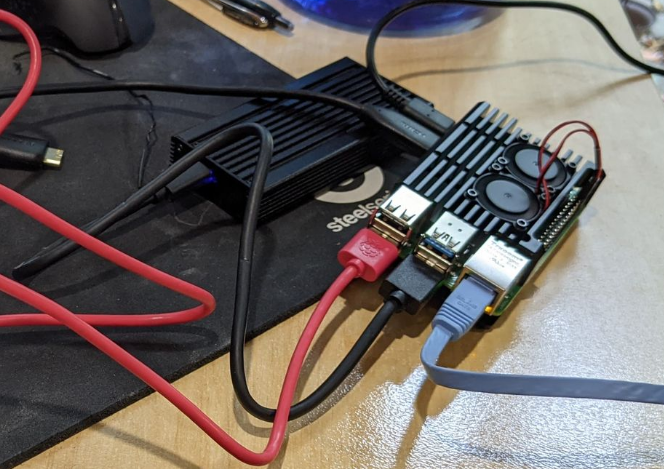
Below I will outline the process I used to create a micro mining rig using a Raspberry Pi 4 and 2 external USB drives for storage (the only limit in space here is the number of external drives or storage you can hang off the pi, you can always set up additional network storage). There are many possible configurations that you can use to achieve the same effect, however, that is quite outside this article's scope for now.
First, you will want to source the required hardware, see below:
Required Hardware
- Raspberry Pi 4 model b
- USB-C power cable
- USB 3 NVMe M.2 SSD Enclosure
- NVMe M.2 SSD drive (Recommended at least 1TB)
- Your choice of External USB drives (we went with 2x 12TB USB Western Digital External Drives)
- Network cable, keyboard, monitor, etc (Pi has 2x micro-HDMI ports, I used a micro-HDMI to HDMI cable to an existing monitor)
Once you have all the required hardware, throw the SSD into the enclosure and plug that bad boy into your PC (assuming Windows will be used for flashing, vary as appropriate, Linux and mac users can use DD, etc to the same effect).
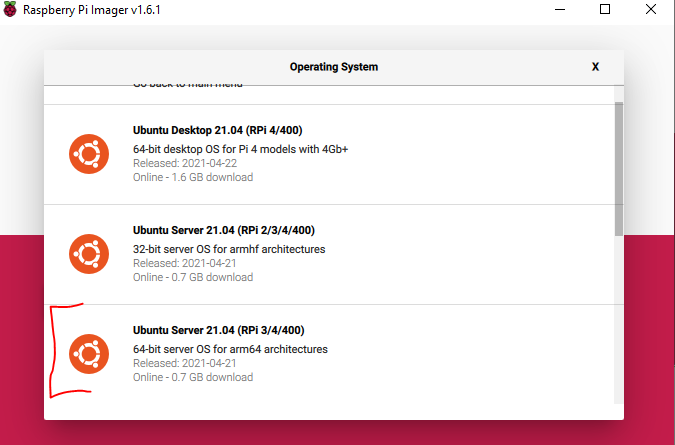
Next, you'll want to download a flashing program, I recommend the Raspberry Pi Imager straight from their website (see below), this wasn't around back in the day when I first played with Pi's, however it is an extremely welcome new addition that makes setting up Raspberry Pi's a breeze.
Required Software
- Raspberry Pi Imager, is used to both source and flash your SSD drive with an operating system image. We went with Ubuntu Server 64bit. You could also use Balena Etcher or equivalent Image Flashing software if you had a custom image in mind.
- Chia GUI installer or Source Code
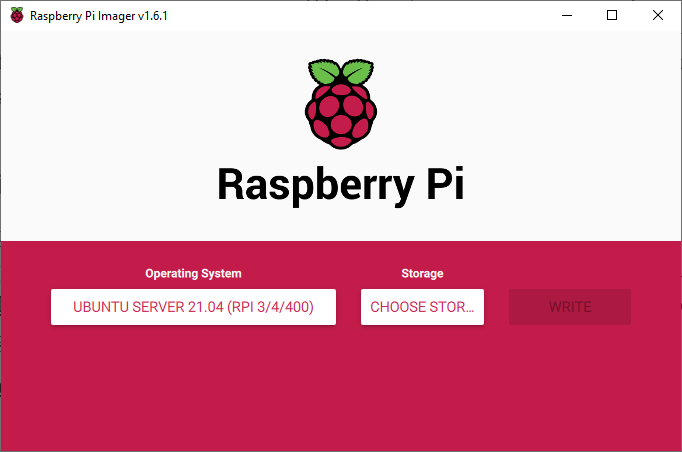
Boot up your imager (Raspberry Pi Imager in our case), select the OS you wish to run (we went with Ubuntu Server 21.04 64-bit for simplicity), select your drive, then hit Write.
Once your drive is flashed, eject it and plug it into a USB 3 slot on your Pi. Plug in your external drives, monitor, etc, and boot it up.
Now, my Pi booted up straight from the SSD drive with no issues, however, if yours does not, you may have to flash a basic Raspbian OS onto an SD card, boot the Pi, and then enable USB boot before attempting to boot again (FYI, there is a boot from USB SD card flashing option in the Raspberry Pi Imager which could come in handy).
Once your Pi boots up, assuming you used the Ubuntu image as I did, you'll need to change the default password before being shown the standard prompt.
Connect and mount your external drives
Before mounting your drives, you'll want to create some directories to mount them to. I went for the following.
sudo mkdir /media/drive1
sudo mkdir /media/drive2
Now, get your external drives ready, plug them in, power them up and then run the following command to find out what they are called.
sudo fdisk -l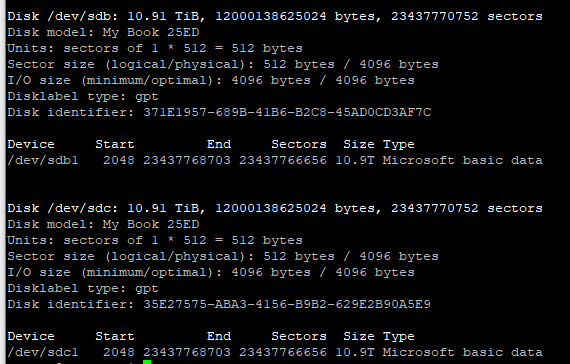
Remember the paths above, (/dev/sdb1 and /dev/sdc1 for us), these are our external USB drives.
We now want to get the UUID of these drives so we can auto-mount these at start time. Do this by running:
sudo blkid | grep sdb1
sudo blkid | grep sdc1
Once you have these UUID's we can create entries in fstab for them to mount at boot time, add the following 2 lines (or more depending on your situation) to the bottom of your /etc/fstab file (using your UUID's obviously).
UUID=7E86-657C	/media/drive1	auto	nosuid,nodev,nofail	0	0
UUID=CE42-9C19	/media/drive2	auto	nosuid,nodev,nofail	0	0
To check your configuration and also mount the drives run:
sudo mount -aAs long as you don't get any errors it should have been successful and you can change the directory to one of the ones you created earlier (ie /media/drive1) and it should work!
Update 23/05/2021: Since writing this section, I've had issues with permission errors while copying files between drives, this is because the USB drives were mounting as Root, here is an option below for mounting them as the ubuntu user which got rid of my issues. My drives were also exFat formatted, so I changed auto to exfat, this wasn't necessary, but I did it more due to clarity.
UUID=7E86-657C	/media/drive1	exfat	defaults,uid=1000,gid=1000	0	0
UUID=CE42-9C19	/media/drive2	exfat	defaults,uid=1000,gid=1000	0	0
Install Chia
Time to install Chia!
Go to the Chia Github Ubuntu install instructions and follow along, ill post the generic steps here too.
I installed Chia straight into my home directory (~/), so all install instructions will be based on that relative location, adjust as necessary.
Basic Chia Install (Ubuntu)
sudo apt-get update
sudo apt-get upgrade -y

# Install Git
sudo apt install git -y

# Checkout the source and install
git clone https://github.com/Chia-Network/chia-blockchain.git -b latest --recurse-submodules
cd chia-blockchain

sh install.sh

. ./activate

chia start farmer
Chia Install Commands
That's it! You will now have a working running Full node, which includes farmers/harvesters and Wallet.
Add your plot directories to Chia
Now that we have Chia installed, it's time to add your plotting directors to be monitored by the Chia Daemon.
chia plots add -d /media/drive1
chia plots add -d /media/drive2
Now Chia should be monitoring those directories for plots and should be able to farm them.
Checking your Chia Status
Your wallet will have to sync to the blockchain, you can monitor the progress and also see if you have any coins by running:
chia wallet showTo check the status of your farm, including sync states and total Plot storage, run:
chia farm summaryThat's it for today's guide, Happy Harvesting!
Advanced topics including how to Run Chia on Boot, Mount a remote NFS Share, and Move plot files from NFS share to local USB automatically are available below to our registered members, please consider signing up it's free! (or paid if you are kind enough to want to support my work).
Run Chia on Boot
You want chia to run on start I hear you ask? I did too, here is how you do that.
Create a file called chia_startup.sh in your chia-blockchain directory (our full path was ~/chia-blockchain/chia_startup.sh .
#!/bin/bash

cd ~/chia-blockchain/

. ./activate

chia start farmer
chia_startup.sh
Now create a cron job to run the startup script by running:
crontab -eAdd the following to the bottom of the file then save.
@reboot sh ~/chia-blockchain/chia_startup.shcrontab -e
Next time you reboot your chia node will start automatically!
Mounting a remote NFS share
I had an additional need to be able to access plots from a network shared drive (where I have other machines plotting too), you can mount this drive on your Pi by adding the following to your /etc/fstab file.
192.168.1.34:/volume1/Files/chia/plots /mnt nfs defaults 0 0
/etc/fstab
Moving Plot files to a local USB drive from NFS share automatically
Now that I had an NFS share mounted, I wanted any plot files that show up in that directory to be automatically moved to my local USB drives.
I did this by creating a Cron job that did a basic Linux move (mv) on the hour every hour, see below. Add the following (or similar) to your crontab -e .
0 * * * * mv /mnt/*.plot /media/drive1crontab -e


Comments ()